Wednesday, February 15, 2012

Beading, Building, and Messy Fun

For our beading week, we started the 2s classes off with a simple bracelet making activity with large beads and pipe cleaners. The stiffness of the pipe cleaners make it easy for the little ones to practice their hand/eye coordination. Some kids were super into the beading and finished it off by twisting the pipe cleaners into a circle to make a bracelet. Other kids had absolutely no interest in beading and preferred to go straight into painting or gluing instead.
After their beading exploration, each child was given their watercolor paintings from last week to continue their work. With the watercolors dry, the kids could now add to their paintings with markers, glue and fun Valentine collage bits. Some kids decided to use the beads for the collage instead of the bracelets... great idea!
Our hope was that the kids would use glue sticks for their collages so that they could take them home in time for Valentines day. As it turns out, 1 and 2 yr olds would much prefer to to squeeze white or colored glue rather than rub an unfamiliar clear stick onto their paper- imagine that!
For the last part of class, the teachers brought out our super fun floor painting tools and a canvas for some gross motor painting. The toilet plungers made really cool circle prints, but the child-sized broom was probably the hottest commodity.
After each class, we added painters tape to the canvas to preserve some of their work before the next class got to the painting. Once all of the classes have had a chance to add to the 2 canvases, we'll peel off the tape and see if we can find the contrast between the classes.
While some kids got messy on the floor, the table was full of various tools for more collaborative painting.
The 3s, 4s, and 5s classes worked on an entirely different type of beading project. They began with a block of wood, markers, paper shapes, nails, and mallets to make the base for beaded sculptures. Of course they loved the hammering part!
After drawing on the wood and hammering nails and paper shapes onto their blocks, the kids attached craft wire to the nails (we used Twisteez craft wire, which is super flexible and coated with colorful plastic). Finally the kids threaded the wire with beads before attaching the other end of the wire to another nail on the wood block.
 Some chose to embellish their sculptures with glue, glitter and more collage items.
 We even had a sibling pop in to help her older sister finish her sculpture!
Don't you love how they turned out?! Once finished, kids can experiment with bending the wire to create all kinds of new sculpture forms.

Friday, February 10, 2012

Watercolor Techniques and Valentines

We started off our watercolor week with a bleeding tissue experiment in the 1s/2s classes. The children placed pieces of "bleeding" tissue paper (the colors bleed when wet) onto their watercolor paper and used a variety of tools to moisten the tissue with water. When the watercolor dry, the children will use them as a base for making valentines.
Aside from the basic sponges, the children used droppers, sponge rollers, sponge stamps, and spray bottles to get their tissues to transfer color to their paper. All of these tools provide the kids with  different opportunities to develop their fine motor skills.
The spray bottles are not only a blast (pun intended!), but they also help to strengthen little hand muscles.
 Spray bottles and brushes were used at the easels with liquid watercolor to explore the dripping effect.
After some super wet exploration, the kids were introduced to foam paint (a non-toxic paint with a shaving creme texture). I like to provide white foam paint so the kids can add paint themselves and create their own colors. Adding glitter is fun too!
 Spraying foam paint on the acrylic wall panel offered a different kind of messy sensory experience!
In the older 3s/4s and 4s/5s classes, the children started off with a still life drawing of a pot of daffodils. For their drawings they used black sharpies and oil pastels, which are a great base for the watercolor resist technique. Each child was given a few different sized pieces of watercolor paper so they could eventually turn these works into Valentines.
After drawing, the children were given liquid watercolor and watercolor brushes to add more dimension to their work.
 A finished still life from the 4s/5s class:
If you'd like to try these techniques at home, check out our Make+Believe Wonderful Watercolor Resist! Supply Kit.
After working on the paintings, the kids made different Valentines by gluing small collage items onto bright tag board. The hearts and butterfly paper shapes were made by using a paper puncher on old paintings- a great way to re-use old artwork that you would otherwise throw away!
With our sporadic weather, we occasionally hit a warm day and get to have some fun outside in the garden after art class. It looks like a dance party going on on top of the hay stacks!

Friday, February 3, 2012

Giveaway! Win this Watercolor Resist Supply Kit.

This week was full of watercolor exploration in the studio, so I have decided to offer the Make+Believe Wonderful Watercolor Resist! Supply kit as our next giveaway item.
For a chance to win, all you have to do is post a comment or question in the General Discussion section of the forum on makeplusbelieve.com (you can create your own topic, or reply to someone else's).
Next week, on Thursday, February 9th, a random winner will be chosen from all of the comments. Thanks for participating!

Wednesday, February 1, 2012

Clay Exploraton and Self-Portraits

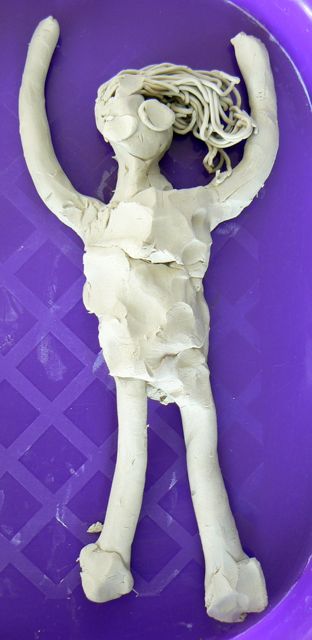
Self Portrait- 3.5 yrs old
For our clay week, the toddlers began their exploration with a variety of tools: clay hammers, plastic pizza wheels, plastic scissors and textured rolling pins. They also learned about rolling the clay into balls and coils to create small pieces that are easier to handle.
The garlic presses have proved to be quite popular with the little ones!
The teachers then introduced the technique of making prints by pressing various objects in to the clay. This was also explored in the opposite way with our press molds, where the children pressed clay into a mold of a shape or design. When they peeled it up, the clay took the same form as the mold!
Pretty soon, decorative items and paint were brought out to add to the clay.
For the 1s classes, the easels are a constant source of entertainment and investigation!
The older classes worked on sculpture and modeling. The 3s class focused on general sculpture and were offered toy trucks on the table as an inspiration. Some children opted to try to sculpt a truck, while others worked on more abstract sculptures using toothpicks to hold small shapes together. The 3s/4s and the 4s/5s classes all worked on self-portraits. They began by looking at a mirror and drawing themselves with a pencil and paper. After this initial step, they began to sculpt their faces out of clay. Some even went on to sculpt their whole bodies, which required learning about "scoring and slipping" the clay to attach two pieces together.

A self-portrait from the 3s/4s class:
In addition to making self-portraits in the 3s/4s class, some of the children were still very focused on their "houses" from last week. As a proponent of emergent curriculum, I believe it's important to follow the children's interests and guide the project in a new direction if need be. Luckily, the teachers believe in this as well and are great at facilitating this process! In this case, the children decided that they wanted to create furniture and various items to go into their houses. Their teacher, Jhaya, helped them figure out how to use the clay (along with other materials) as a medium for this work. Here is a bed for a fairy house made from clay and fabric...
I love the idea of extending the "house" project over multiple weeks. This is a great example how a simple art activity can turn into a long-term project with the right enthusiasm and guidance. We'll see this week if there is any interest in continuing this exploration!
If you're interested in trying these projects at home, check out our Make+Believe Create With Clay! Supply kit.